Encrypt Data Source Fields
If your custom data source includes private or sensitive data, you can protect that data by encrypting specified fields for all users. To encrypt fields in a custom data source, follow the steps below:
You can only encrypt fields in a custom data source using this process. To encrypt fields in a no-code data source, see Enable Encryption.
Select the main nav icon,
 , and select Enterprise Components. The Enterprise Components screen displays.
Select the custom data source you want to enable encryption for. The data source Overview screen displays.
On the data source configuration panel, select Connections. The Connections screen displays.

In the relevant connected instance, select Edit. The data source configuration window displays.

Select the Security tab. The Security tab displays.

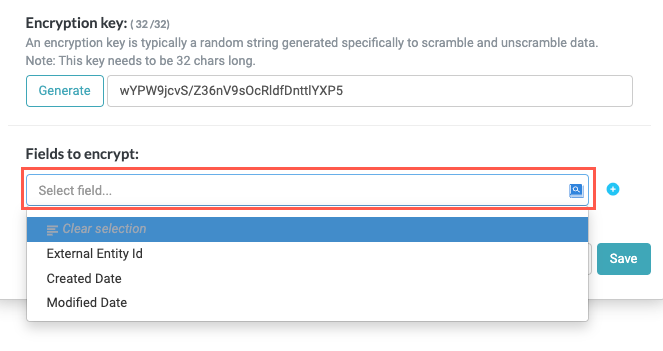
In the Encryption key field, select Generate to generate a new 32-character key or manually insert a 32-character key.

Select the Fields to encrypt dropdown and choose the field you want to encrypt. Select the add field button,
 , to add another dropdown field.
Only fields received by the data source are available. We recommend sending a test webhook event to the data source to add all relevant fields to the data source, making them available in the Fields to encrypt dropdown.
When finished, select Save.
Values for encrypted fields display with the prefix "ENCRYPTED":

Only the values for the encrypted fields received after configuring encryption are encrypted. Any values that exist prior to configuration are not retroactively encrypted. For this reason, we recommend setting up configuration as early as possible when working with sensitive data.
Decrypt Field Values
Encrypted fields are encrypted for all users until they're decrypted in a module action. To decrypt field values, you must create a custom action and leverage a formula field using the Decrypt formula:
After you create the relevant custom action for your data source, navigate to the Response Handling screen.
Select + Add Field. New field Name and Value fields display.

Select the insert field button,
 , and select the Formula Fields button. The list of available formulas displays.
In the search field, enter "Decrypt" and select the Decrypt formula. The Create formula window displays.

Select the Encrypted Field placeholder and insert the field that contains the encrypted value, then select Done.

The field value is decrypted when the custom action is activated.