Facebook Lead Ads Webhook
Facebook Lead Ads are a specialized type of Facebook ad that allows you to collect information from prospects without needing to send them to a separate page. When someone clicks on your lead ad, they're prompted to fill out a form that's prepopulated with their Facebook credentials, where possible. You can then use this information to follow up with potential customers or add them to your lead lists.
With Tonkean, you can monitor Facebook Lead Ads as a data source to collect campaigns, lead gens, and other entities. Setup for this data source using OAuth requires the same procedure as other native data sources.
Additionally, you can set up a webhook connection that sends lead gen updates from your Facebook app directly to Tonkean. Setting up this webhook requires additional configuration, which is detailed in the sections below.
We recommend that only admins set up the webhook option—knowledge of REST API clients and API troubleshooting experience is required.
Prerequisites
Facebook Business Manager account.
The person responsible for account management in your org may need to add you to an existing Business Manager account.
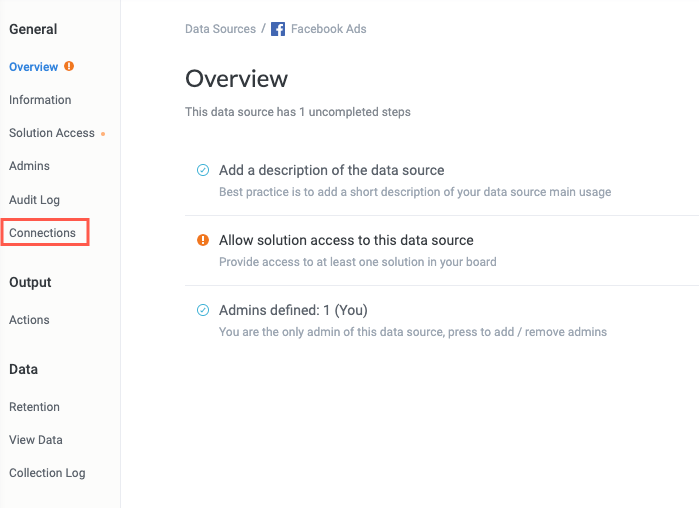
Create a Facebook Ads Data Source in Tonkean and Copy the Webhook URL
First, add a new data source for Facebook Lead Ads and copy the webhook URL.
Connect Facebook Ads as a native cloud application.
In the Add New Data Source window, select the Facebook Ads data source, not the Facebook Lead Ads data source.
In the Set Update Data Source window, select the relevant account you want to connect, then select OK.
In your newly-created Facebook Ads data source, select Connections in the data source configuration panel. The Connections screen displays.
In the Facebook Ads connected instance, select Edit. The Set Up Data Source window displays.
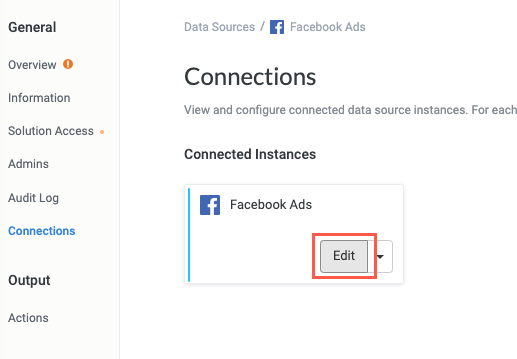
Select Create Facebook Ads Webhook Endpoint. The endpoint URL displays.

Copy the webhook endpoint URL and save it in a separate document.

When finished, select OK.
Create a New App in Meta for Developers
Next, create a new app in Meta that can send events to Tonkean using the webhook connection.
Navigate to Meta for Developers.
Create a new app. Make sure to configure the below settings as described:
When asked which use case to add to your app, select Other.
Select the Business app type.
Provide an app name, such as Tonkean Lead Gen.
Add App ID and Set Up Webhook
Configure the app and webhook.
Add App ID
Retrieve the Meta app ID and secret token for use later in the process.
In your newly-created app, select Settings > Basic in the sidenav. The Basic Settings screen displays.
Copy the App ID and App secret values and save these in a separate document.
In the sidenav, select Settings > Advanced. The Advanced Settings screen displays.
Scroll down to the Advertising Accounts section and in the Authorized ad accounts IDs field, paste in your App ID. When finished, select Save changes in the lower right.
Set Up Webhook
Set up the webhook that allows your newly-created app to communicate with Tonkean.
In the sidenav, select Add Product.
Scroll down to the Webhooks card and select Set up.
Select the dropdown at the top of the screen and select Page, then select Subscribe to this object. The Edit Page subscription window displays.
In the Callback URL field, enter the webhook endpoint URL you created in Tonkean.
In the Verify token field, enter any string.
The verify token is not used by Tonkean but is required in the Meta app.
Select Verify and save in the lower right. The Edit Page subscription window closes and the Page objects display.
Scroll down to the leadgen object and select Subscribe. A success message displays indicating that you've subscribed to the leadgen object.
Add App Permissions and Grant Access
With the webhook set up, you must add permissions to your app and grant access to the app on the relevant page.
Navigate to the Graph API Explorer.
In the Meta App dropdown, select your app.
In the User or Page dropdown, select Get User Access Token. A new Access Token displays.
In the Permissions field, add the following permissions one at a time:
read_insights
pages_show_list
ads_management
ads_read
business_management
leads_retrieval
pages_read_engagement
pages_manage_metadata
pages_manage_ads
In the Access Token field, select Generate Access Token. A login window displays where you confirm the account you want to add these permissions for.
Follow the steps provided in the login window to complete the connection.
Once complete, a success message displays in the login window: {Username} has been connected to {app name}
You must have an existing page to complete the connection.
Select Got it in the lower right to close the login window. The newly-generated Access Token displays.
Copy the Access Token and save it in a separate document.
Generate a Long-Lived Page Access Token
A long-lived page access token helps avoid future problems with verification when the Facebook Lead Ads data source updates.
Before submitting the requests below to generate the long-lived page access token, retrieve the following values you generated or saved earlier in the process:
In the Graph Explorer, submit the following API requests, replacing each instance of the ID and token values with your app's unique values:
Select the GET method and enter
oauth/access_token?grant_type=fb_exchange_token&client_id={app-id}&client_secret={app-secret}&fb_exchange_token={access-token}and select Submit. The response returns the long-lived user access token.Make sure when pasting the queries into the Graph Explorer that special characters are not automatically escaped, such as the ampersand "&" being replaced with "&".
Copy the long-lived user access token into a separate document.
Select the GET method and enter
me?fields=id&access_token={long-lived-user-access-token}and select Submit. The response returns the user ID.Copy the returned user ID into a separate document.
Select the GET method and enter
{user-id}/accounts?access_token={long-lived-user-access-token}. The response returns the data object, containing two needed fields:access_token- Long-lived page access tokenid- Page IDThis is the
idvalue nested one level below thedataobject (displayed below the relevant page name), not theidvalue contained within thecategory_listobject.
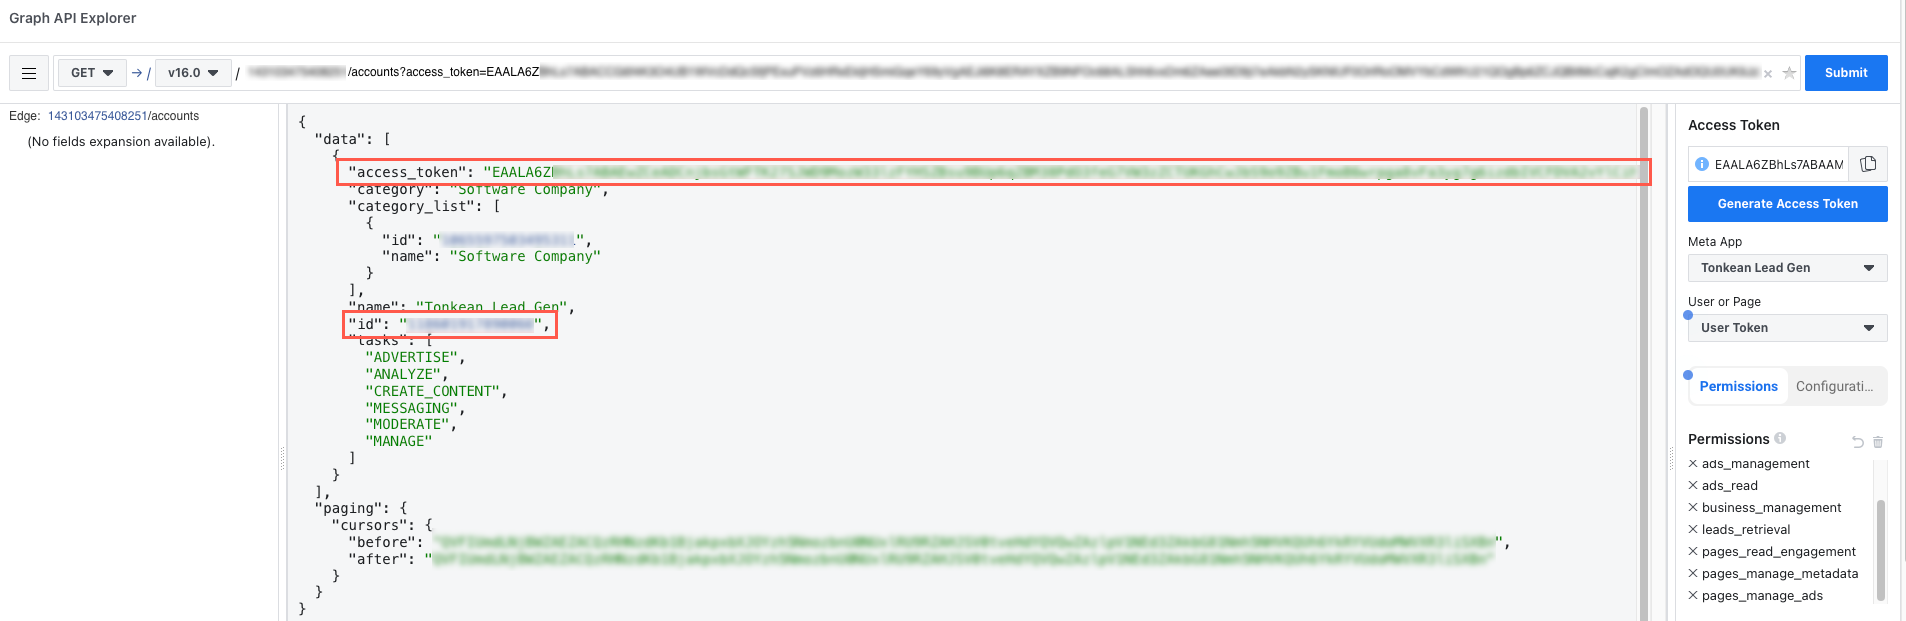
Copy the access token and ID into a separate document.
The access token returned in this response is not the access token you generated earlier in the process.
Install the App on your Page
With the long-lived page access token and relevant page ID, install the app on your page:
Select the POST method and enter
{page_id}/subscribed_apps?subscribed_fields=leadgen.In the Access Token field, enter the long-lived page access token return in step #6 of Generate a Long-Lived Page Access Token.
With the request configured and the long-lived page access token entered, select Submit. A success message is returned.
If an error occurs, use the generated error message to troubleshoot the problem. Common mistakes include pasting in the long-lived user access token instead of the long-lived page access token.
Your app is successfully installed on your page and you're ready to test.
Test the Webhook
With your app and webhook configured, you can test the webhook with any existing forms you have in your Meta for Developers instance.
Navigate to the Lead Ads Testing Tool.
Select the relevant Page and Form you want to test.
You must have forms to test the webhook. To learn more about creating Lead Ads forms, see How to Create a Lead Ad from Your Facebook Page.
Beside the Form dropdown, select Preview form. The form displays in a new window.
Select Create lead. This activates the webhook, sending the test data from the form to Tonkean.
Navigate to the Facebook Ads data source in Tonkean and select View Data in the data source configuration panel. The Facebook Ads| View Data screen displays.
Select the Entity dropdown and select Lead Gens.
Confirm the test lead gen you created in the Lead Ads Testing Tool displays.
Your Facebook Lead Ads webhook is configured and ready to start sending leads to Tonkean.