Workflow Formulas
Workflow formulas calculate a value for a single item using that item's fields. Because the result behaves like any other field on the item, you can use it in conditions, dependencies, automations, Update Field actions, filtering, sorting, business reports, and other formulas. Tonkean recalculates a workflow formula whenever a field it depends on changes.
Common uses for workflow formulas include combining existing "First Name" and "Last Name" fields into a "Full Name" field, calculating the number of days until a due date, or flagging requests that exceed an approval threshold.
To calculate a value across multiple items, use an Aggregation Formulas. To create text that only displays in a widget or communication, such as localized helper text, use a UI-Only Formulas.
Create a Workflow Formula
To create a workflow formula, follow the steps below:
Select the main nav icon,
 , in the top left corner and select Solutions Studio. The Solutions Studio screen displays.
Select the module you want to create the workflow formula in. The module builder screen displays.
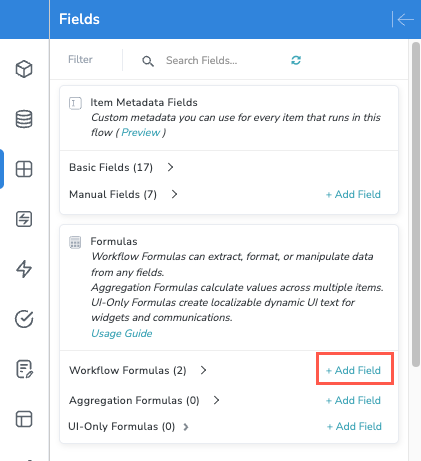
Select the Fields button on the module builder toolbar. The Fields panel displays.
In the Formulas section, beside Workflow Formulas, select + Add Field. The Field Settings screen displays.
You can only add and edit fields in the Build environment. In Production, select View beside a field to see its configuration.
Enter a Name for the workflow formula.
In the Data Settings section, write the formula expression. For detailed steps, see Write a Formula Expression.
To edit the formula as text, select the options menu,
 , then select Show Advanced View. Select Show Builder View to return to the formula builder. The Advanced view is unavailable while the formula is invalid.
Select Next. The Display Settings section displays.
Next is available only when the formula is valid.
Configure how the formula value displays. The available options vary depending on the data type the formula returns:
Display as - Select the data type used to display the value, such as text, number, or date.
Format - Select a display format for the selected data type. If you select URL, you can also enter a URL label to display instead of the full URL.
Decimal places and Show trailing zeros (number values only) - Set how many digits display after the decimal point. This setting affects how the number displays, not how it's stored.
Compare trend to (number values only) - Select the time frame to compare the current value against: Yesterday, Last week, or Last month. When the value changes, a trend indicator displays the change compared to the selected time frame.
Increment is (number values only) - Select whether an increase in the value is Positive or Negative. For example, select Negative for a value such as processing time, where an increase is unfavorable.
Display Separator (multi-value text only) - Enter the character or text used to separate values when they display.
+ Add field label - Enter a brief, descriptive label that represents the field to process contributors in messages, forms, and business reports. Field labels can contain up to 500 characters.
Select Next. The Display Conditions & Follow-Ups section displays.
If relevant, select Add rule to create a rule that determines the display condition and status of the field based on its value.
Use the conditions dropdown to set the desired condition. For example, to draw attention to a value greater than zero on a business report, set the condition to Greater than and the color to Green. The default condition is Equal to and the default color is Green.
For more information about conditions and logical operators, see Conditions.
Select Next. The Additional Information section displays.
In the Additional Information section, configure the following settings:
Field description - Enter a description of what the field contains and how it should be used. Tonkean AI uses the field name, type, and description as additional context to understand the field, so a clear description helps AI features work with the field accurately. You can also include specific instructions in the description, and you can add formulas and solution preferences to include dynamic values.
Field group - Enter a name to assign this field to a field group. This is designed for advanced use cases where you can use entire groups of related fields, identified by the field group name, in formulas and other operations.
Field Update Scope - Select which items receive updated values. Narrowing the scope can improve performance when a module has a large amount of active data.
Parent & Child Records (default) - Updates the value on items and their inner items for full consistency.
Parent Records Only - Updates the value on items only. This option provides faster summary updates when you don't need inner item details.
Child Records Only - Updates the value on inner items only. This option is useful for detailed, row-level views.
No Automatic Updates (Static) - Disables automatic updates. You manage updates to this field manually.
When finished, select Save in the upper right. The workflow formula is added to the Workflow Formulas section in the Fields panel. Expand the section to see it.
Manage Workflow Formulas
To open a workflow formula's settings, select Edit beside the field in the Fields panel. In Production, select View instead.
Select the ellipsis menu beside a workflow formula to access the following options:
Filter Dependent Triggers - Displays the module's triggers, filtered to show the triggers that use this workflow formula.
Filter Dependent Triggers - Displays the module's triggers, filtered to show the triggers that use this workflow formula.
Duplicate Field - Creates a copy of the workflow formula. This option is available only in the Build environment.
A crossed-out eye icon beside a workflow formula indicates the field isn't used by the module or its interfaces. Tonkean doesn't calculate unused fields, so the formula has no value until it's used in the module or an interface.